One of the supermarket items we seem to go through a lot are fruit bars (also called cereal bars, muffin bars and a variety of other names) you know the ones, the biscuity/muffiny bar filled with some kind of fruit filling, the easy to grab snack that's handy for a bag, a lunchbox or to give to fussy kids as you're out an about. Well, Shaun and Jessica really like them so I thought, why not start my foray into the 'make it myself world' by making some of these. Sounds easy....I thought so too, until I trawled through countless sites on the web looking for a recipe that was simple, easy and used things I already had in my cupboard. Not so easy anymore.
So last Sunday while Daryl and Shaun were having a boys day in the truck, I decided to just do it, or more to the point try something! So figuring out that a fruit bar was most like a biscuit out came the trusty Edmonds cookbook and I settled on Honey Oat Biscuits (with some slight modifications) and Jessica and I got down to business.
So last Sunday while Daryl and Shaun were having a boys day in the truck, I decided to just do it, or more to the point try something! So figuring out that a fruit bar was most like a biscuit out came the trusty Edmonds cookbook and I settled on Honey Oat Biscuits (with some slight modifications) and Jessica and I got down to business.
| Simple ingredients: 125g softened butter 1/2 cup sugar 2 Tbsp honey 1 cup standard flour | 1 tsp baking powder 1/2 tsp cinnamon 1/2 cup rolled oats stawberry jam | 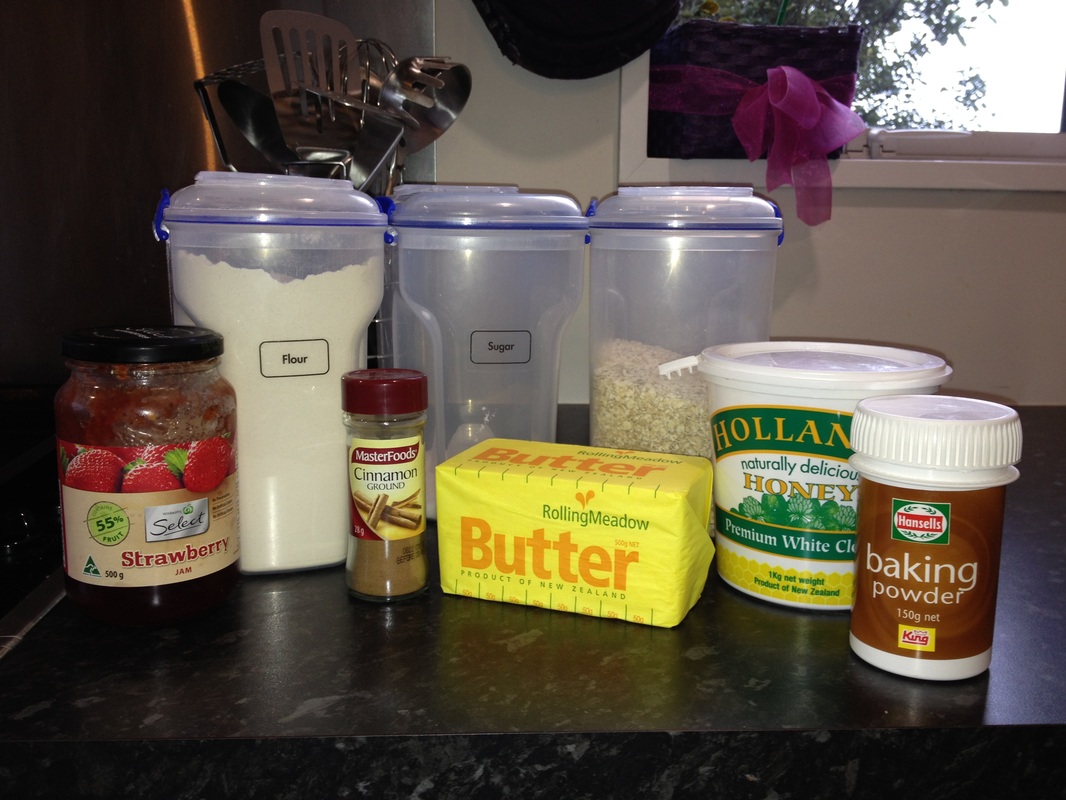
|
So with Jessica standing on a seat next to me, we begin: cream butter, sugar and honey together until pale. All going well until Jessica gets hold of a spoon and starts 'mixing'. No problem, get her a little bowl, put some flour in it. She's happy mixing away so I continue.
Sift flour, baking powder and cinnamon together. Add sifted ingredients and rolled oats (at this point I used less than the recipe called for (1/2 cup of oats instead of 1 1/2) as the mixture was looking pretty dry) to creamed mixture, stirring well.
Sift flour, baking powder and cinnamon together. Add sifted ingredients and rolled oats (at this point I used less than the recipe called for (1/2 cup of oats instead of 1 1/2) as the mixture was looking pretty dry) to creamed mixture, stirring well.

Suddenly the smell of cinnamon really hits me and I check my mixture thinking that 1/2 teaspoon of the stuff can't smell this potent. I think glance at Jessica and sure enough she's grabbed the spice jar, opened it and proceeded to shake cinnamon into her mixing bowl, and on the counter, and on the chair, and on the floor.
So my mixing goes on pause while I fill a shaker with flour for Jessica and substitute that for the spice jar. She then quite happily shook that all over everything!
So my mixing goes on pause while I fill a shaker with flour for Jessica and substitute that for the spice jar. She then quite happily shook that all over everything!
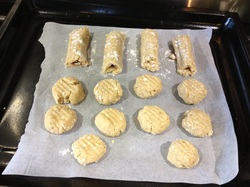
Ok, the mixing was done and the next thing was to roll the mixture flat. I prefer to do this on baking paper as I find that no matter how much flour I use the dough still sticks to the counter if I don't. However as I pulled out my baking paper, there was only a small amount left. Sigh, what now. I decide to use it to roll half the dough flat and then give it a wipe off and use it to bake the bars as well. This could work. So I roll the dough out into a rectangle and spread a stripe of strawberry jam down the middle. Of course at this point I discover I only have enough jam for two rectangles. Never mind I can still make biscuits.
The real tricky bit with these bars was to roll them up nicely. I ended up using the baking paper to lift one side of the dough rectangle and folding it over the jam to the other side and then kinda squishing it shut and rolling them together. Two rectangles made two logs which I then cut in half to make four bars.
Next it was into the oven to bake at 180 degrees for about 10 minutes (I did mine for a bit longer and they came out harder than I would like so I think 10 minutes would be about right.
Let them cool then enjoy and enjoy we did. I wasn't sure what to expect but what I got was a really yummy jam filled bar. They held their shape, the jam stayed inside and they had a nice texture to them. All in all some sucess with a bit of drama...next time I think I'll check I have enough of all the ingredients and baking paper before deciding to bake!!

 RSS Feed
